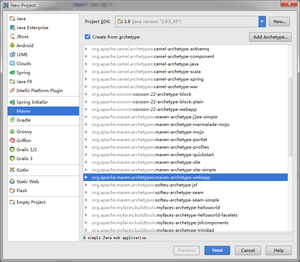
As described in the previous blog post about creating a Maven project, create a Spring Maven project.
POM File Configuration:
 1
 2
 3
 4
 5
 6
 7
 8
 9
10
11
12
13
14
15
16
17
18
19
20
21
22
23
24
25
26
27
28
29
30
31
32
33
34
35
36
37
38
39
40
41
42
43
44
45
46
47
48
49
50
51
52
53
54
55
56
57
58
59
60
61
62
| <project xmlns="http://maven.apache.org/POM/4.0.0" xmlns:xsi="http://www.w3.org/2001/XMLSchema-instance"
xsi:schemaLocation="http://maven.apache.org/POM/4.0.0 http://www.w3.org/2001/XMLSchema-instance">
<modelVersion>4.0.0</modelVersion>
<groupId>com.coinidea</groupId>
<artifactId>web</artifactId>
<packaging>war</packaging>
<version>1.0-SNAPSHOT</version>
<name>hive.web Maven Webapp</name>
<url>http://maven.apache.org</url>
<properties>
<spring.version>4.2.5.RELEASE</spring.version>
</properties>
<dependencies>
<dependency>
<groupId>junit</groupId>
<artifactId>junit</artifactId>
<version>3.8.1</version>
<scope>test</scope>
</dependency>
<!--spring-->
<dependency>
<groupId>org.springframework</groupId>
<artifactId>spring-context</artifactId>
<version>${spring.version}</version>
</dependency>
<dependency>
<groupId>org.springframework</groupId>
<artifactId>spring-core</artifactId>
<version>${spring.version}</version>
</dependency>
<dependency>
<groupId>org.springframework</groupId>
<artifactId>spring-web</artifactId>
<version>${spring.version}</version>
</dependency>
<dependency>
<groupId>org.springframework</groupId>
<artifactId>spring-webmvc</artifactId>
<version>${spring.version}</version>
</dependency>
<dependency>
<groupId>org.springframework</groupId>
<artifactId>spring-test</artifactId>
<version>${spring.version}</version>
</dependency>
</dependencies>
<build>
<finalName>web</finalName>
</build>
<repositories>
<repository>
<id>people.apache.snapshots</id>
<url>http://repository.apache.org/content/groups/snapshots-group/</url>
<releases>
<enabled>false</enabled>
</releases>
<snapshots>
<enabled>true</enabled>
</snapshots>
</repository>
</repositories>
</project>
|
Install Tomcat locally. If you don’t know how to install Tomcat, please search for instructions online.
Tomcat Configuration
Run -> Edit Configurations, click “+”, and select Tomcat Local.
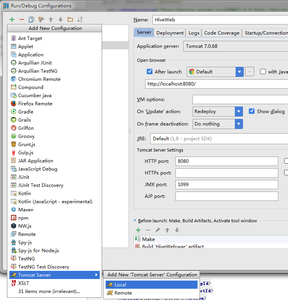
- In the “Server” tab, configure the local Tomcat path; in “Deployment”, select “+” -> Artifact.
- After running, the default Hello World page will pop up.
- Create your own Controller
- web.xml configuration
 1
 2
 3
 4
 5
 6
 7
 8
 9
10
11
12
13
14
15
16
17
18
19
20
21
22
23
24
25
26
27
28
29
30
31
32
33
34
35
36
37
38
| <?xml version="1.0" encoding="UTF-8"?>
<web-app xmlns="http://xmlns.jcp.org/xml/ns/javaee"
xmlns:xsi="http://www.w3.org/2001/XMLSchema-instance"
xsi:schemaLocation="http://xmlns.jcp.org/xml/ns/javaee http://xmlns.jcp.org/xml/ns/javaee/web-app_3_1.xsd"
version="3.1">
<context-param>
<param-name>contextConfigLocation</param-name>
<param-value>/WEB-INF/applicationContext.xml</param-value>
</context-param>
<listener>
<listener-class>org.springframework.web.context.ContextLoaderListener</listener-class>
</listener>
<servlet>
<servlet-name>dispatcher</servlet-name>
<servlet-class>org.springframework.web.servlet.DispatcherServlet</servlet-class>
<load-on-startup>1</load-on-startup>
</servlet>
<servlet-mapping>
<servlet-name>dispatcher</servlet-name>
<url-pattern>/</url-pattern>
</servlet-mapping>
<servlet-mapping>
<servlet-name>default</servlet-name>
<url-pattern>*.css</url-pattern>
</servlet-mapping>
<servlet-mapping>
<servlet-name>default</servlet-name>
<url-pattern>*.gif</url-pattern>
</servlet-mapping>
<servlet-mapping>
<servlet-name>default</servlet-name>
<url-pattern>*.jpg</url-pattern>
</servlet-mapping>
<servlet-mapping>
<servlet-name>default</servlet-name>
<url-pattern>*.js</url-pattern>
</servlet-mapping>
</web-app>
|
It is worth noting that the default servlet-mapping configuration above solves the Spring static file 404 issue.
All other URLs will go through the dispatcher configuration for URL mapping.
7. dispatcher-servlet.xml configuration
 1
 2
 3
 4
 5
 6
 7
 8
 9
10
11
12
13
14
15
16
17
18
19
20
21
| <beans xmlns="http://www.springframework.org/schema/beans"
xmlns:xsi="http://www.w3.org/2001/XMLSchema-instance"
xmlns:context="http://www.springframework.org/schema/context"
xmlns:task="http://www.springframework.org/schema/task"
xsi:schemaLocation="http://www.springframework.org/schema/beans
http://www.springframework.org/schema/beans/spring-beans.xsd
http://www.springframework.org/schema/context http://www.springframework.org/schema/context/spring-context.xsd
http://www.springframework.org/schema/task http://www.springframework.org/schema/task/spring-task-3.0.xsd"
default-lazy-init="false">
<bean class="org.springframework.web.servlet.mvc.method.annotation.RequestMappingHandlerMapping"/>
<bean class="org.springframework.web.servlet.mvc.method.annotation.RequestMappingHandlerAdapter"/>
<!-- Enable Spring MVC annotations -->
<context:annotation-config />
<!-- Set the package where annotated classes are located -->
<context:component-scan base-package="com.coinidea.controller"/>
<!-- View resolver for page paths. prefix: prefix, suffix: suffix -->
<bean class="org.springframework.web.servlet.view.InternalResourceViewResolver">
<property name="prefix" value="/WEB-INF/views/"/>
<property name="suffix" value=".jsp"/>
</bean>
</beans>
|
This specifies that the JSP view folder is located at /WEB-INF/views/ and enables Spring’s annotation features. All Controllers will be looked up in the package com.coinidea.controller.
8. FirstHello Controller
 1
 2
 3
 4
 5
 6
 7
 8
 9
10
11
12
13
14
15
16
17
| package com.cmri.web.controller;
import org.springframework.stereotype.Controller;
import org.springframework.web.bind.annotation.RequestMapping;
import org.springframework.web.servlet.ModelAndView;
@Controller
@RequestMapping("/first")
public class TestController {
@RequestMapping("hello")
public ModelAndView view() {
ModelAndView mv = new ModelAndView();
mv.addObject("message", "HelloWorld!");
mv.setViewName("hello");
return mv;
}
}
|
hello.jsp in the views folder:
1
2
3
4
5
6
7
8
9
| <%@ page language="java" contentType="text/html; charset=UTF-8" pageEncoding="UTF-8"%>
<html>
<head>
<title>hello world</title>
</head>
<body>
${message}
</body>
</html>
|
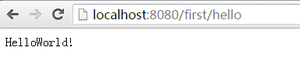
When you visit http://localhost:8080/first/hello in the browser, it will display:
9. Java Web API Controller
When you need to respond to Ajax requests, add the following annotation to the method:
1
2
3
4
5
| @RequestMapping("ajax")
@ResponseBody
public String ajax() {
return "Hello world";
}
|